Wednesday, July 16, 2014

Rule of Thumb: Estimating Fees While Sourcing

To move forward in any goal requires action. What have you done today to reach your dreams?

Amazon fees are high.

If you owned a brick and mortar store you would have to pay monthly: rent, utilities, employees, insurance, advertising & marketing, inventory, and many more little things that all add up to big expenses.

Amazon fees are peanuts compared to owning a brick & mortar store. Seriously.

In all honesty, I wish Amazon would just take a simple percentage in fees. At least it would be easier to calculate. I had to develop a little system to estimate my fees while out sourcing. I'm going to share my system with you today.

My system is based on a pro seller's account. If you have an individual seller's account, you will need to add 0.99 cents to your estimation. Beware that once you sell over 40 items a month, you're literally giving your money away to Amazon. Let's say you sell 80 items as an individual seller. You just gave $40 to Amazon. That's $40 you could have kept in your own pockets! Nuff' said.

I primarily source for small, lightweight products. This keeps my fees and shipping weight to a minimum. If you are sourcing oversized items, then check the FBA fees page in Seller Central.

Standard Media:
$1.02 + weight handling + 15% of sale price
When you consider weight, you need to consider both weight handling and inbound shipping. I round up to 0.50 cents (easier to calculate and gives me a little wiggle room).
$2.52 + 15% of sale price
Since I'm round up on weight handling / shipping, I could easily round down to $2 for simpler and quicker calculation.
$2 + 15% of sale price

Small, Lightweight Products (Standard Sized, Non Media):
$1.02 + $1.00 + weight handling + 15% of sale price
Example for product that is 1 lb. or less: $3.02 + 15% of sale price
Add $1 for each additional pound (keeping inbound shipping in mind)
Since I'm rounding up on weight handling / shipping, I could easily round down o $3 for simpler and quicker calculation.
$3 + 15% of sale price

Evernote Notes (Best. App. Ever.)
I keep the following notes on Evernote to help me make quick estimations (and remember, it's an estimate, not a perfect number):

Standard Media: $2 + 15% of sale price
Standard, Non Media: $3 + 15% of sale price (+$1 per lb. after 1 lb.)

Explanation of the Following - I've calculated the maximum cost of goods in order to take a certain amount of profit based on a specific price point. You can choose to lower the profit amount by either lowering the price point, or paying more than the listed max for the product. You can also up the price by a dollar or a few dollars. This is just a guide to quickly determine the potential profit you could make. Keep in mind that you want wiggle room to lower your price and get out of a product that is a bust. I keep this in my notes as a reference. 

Standard, Non Media, 1 lb. or less (subtract $1 from profit for every lb. over 1)

Price Point: $35.00
COSG Max: $6.75 ($11.75)
Profit: $20 ($15)

Price Point $30.00
COSG Max: $7.50 ($10.00)
Profit: $15 ($12.50)

Price Point: $25.00
COSG Max: $6.25 ($9.00)
Profit: $12 ($9)

Price Point: $20
COSG Max: $4.00 ($7.00)
Profit: $10 ($7)

Price Point: $15
COSG Max: $2.75 ($4.75)
Profit: $7 ($5)

Price Point: $7.99-$10
COSG Max: $1 or less
Profit: $2-4


Tuesday, July 15, 2014

FBA Frequently Asked Questions (FAQ)

YOLO! You can either begin now or wait until your dead.

Where do I find out why an item was returned?
Go to Reports>Fulfillment>Returns

My item was warehouse damaged. What do I do?
Amazon will reimburse warehouse damaged items. To keep a paper trail, open a ticket, give Amazon the ASIN information, tell them the item was warehouse damaged, and ask for reimbursement.

My item was damaged in transit. What do I do?
Same as warehouse damaged.

My item was returned to Amazon damaged. What do I do?
Put in a removal order and have the item sent back to you. Nine times out of ten the item is fine, and you can send it back. If it's truly damaged, you will need to consider selling it as used or on ebay, or writing it off as a loss.

Where do I see my sales?
Go to Orders>Manage Orders>Advanced Search>Click the radio button for Include pending orders>Click on Search. The greyed out items are pending orders. They will go black (and you will get an email) once they are shipped.

Why has my item stayed in pending orders for so long?
Items are pending until Amazon ships it out. How fast an order is shipped out depends on the shipping methods and time frame (Prime orders will ship out faster than non Prime orders). An item will also stay in pending while they gather multiple items for one order, or until the customer provides (or updates) credit card information. It's possible for a customer to make a purchase without realizing their credit card is outdated. They receive emails, but not everyone checks their email daily or even weekly (I know -hard to believe, but it happens).

Why is my item listed as in reserve?
Reason 1: The item is in pending orders. Reason 2: The item is being moved to a different warehouse. Reason 3: The item is being inspected for something (possibly restricted; new listing).

Is it okay to send an item in that's restricted?
Absolutely NOT.

Is it okay to send an item in that's in a gated category?
Do NOT send in an item for a gated category if you haven't gained approval. Example: Jewelry is gated. Costume jewelry is still jewelry. If you don't have approval to sell jewelry, then don't send any type of jewelry in to Amazon.

How do I get approved for a gated category?
Go to Seller Central, click on Help, click on Contact Us, click on Inventory (left-hand side), click on Permission to Sell New Products, Click on the category you want to sell in and READ THE REQUIREMENTS.
Note About Grocery, Health & Beauty, and Personal Care: In May 2014, Amazon gated these categories. Some sellers (those who had a history of selling in these categories) were grandfathered in and automatically approved. Everyone else had to request approval. At first, Amazon requested three invoices, then they allowed three receipts. There have been mixed responses from sellers requesting approval with receipts. Some have received approval while others have not. The latest deduction from the rejected sellers is that tenure as a seller is being considered. If you're very new to Amazon (possibly since April 2014), it appears that you will most likely be rejected. It is unknown how much time you need to be on Amazon before gaining approval to sell in these categories. If anyone is able to figure out this mystery, please post what you discover in the comments (or post your experience if it is different from the above).

What is a multipack?
Two or more of the SAME items packed together.

What is a bundle?
Two or more different, but complimentary items packed together.

Do I need a UPC code, and where do I get them?
If you need to create a new listing, you can use the UPC code on the product, but if that code is already in use, then you will need to purchase and use a new UPC code. You will also need a new UPC code for bundles. I purchase my UPC codes from leadingedgecodes on Ebay (no affiliation).

I received a low feedback rating. Can I get it removed?
If you receive a 4 or 5 star rating, it's advised to leave it alone even if the buyer says something in their comments about the product quality or price. If the buyer leaves product feedback, mentions price (or that they found it cheaper elsewhere), and the rating is 3 or below, open a ticket and request feedback removal. You may or may not be granted removal depending on the wording of the feedback, but always give it a try.

Do you have other questions (or questions / answers that you see frequently)? Please leave them in the comments.


Monday, July 14, 2014

FBA Workflow from Sourcing to Shipping

You can think about things all day long, but until you take action, nothing will happen.

My workflow has changed over time. I didn't even realize it until someone ran into a problem in their own workflow and posted about it on The FBA Flip Side Facebook group. I ship out about once a week or week and a half (depending on my life's schedule and the amount of sourcing money I have on hand). I label all of my own products, and allow Amazon to tell me where to ship. For this reason, I try to get at least 100 items into a shipment in order to fill up boxes.

Here is my workflow from beginning to end:

1. I keep my items safely tucked away in plastic boxes. When I come home from sourcing, I list everything that already has a listing page on Amazon. I set things aside that require a new listing, or belong to a bundle. I store all of the products I've listed together.

2. Once I've bought everything I'm going to buy during a cycle, I gather up all of the items that require a new listing -in other words -photos! I'm not the best photographer, so I have to really work at it. It's easier for me to photograph everything in one session. Once I have decent pictures, I use PhotoShop to give my photos a pure white background. I have a folder for bundles, and a folder with pictures for new listings. I store my photos on my computer until I'm ready to tackle new listings.

3. It's easier for me to tackle all of my new listings at once. I gather all of the items that require a new listing (including my bundles), and go to work. You might consider typing out your Key Features (the bullet points) and description in a Word document first, then copy / paste it in. Be careful not to linger while creating a listing. They can time out, and cause you to have to start all over again!

4. Next, I prep all of my items. I tackle all multiples together: shrinkwrap, polybag, sticker removal, cover barcodes, etc. This is a good time to print off your labels (I use 30 ups and only dream of the day someone buys me Dymo for Christmas -hint, hint to hubby). It's easier if you label all of your multiples together, so that you don't have to go on a search through your labels one item at a time. If I place a label onto the outside of shrinkwrap or a polybag, I cover it with clear packing tape to ensure that it doesn't fall off.

5. I'm ready to pack! I have an assortment of boxes on the ready. I begin by opening up the "Review Shipment" tab, and clicking on "View Shipping Contents" for each warehouse. Trust me when I say that you should PRINT the page opened to all of the contents for each warehouse. It will be multiple pages, but this is the way that I ensure that I don't mix up my widgets. I use a highlighter to highlight the fulfillment center, and put each FC's shipping content's pages together. I tackle one FC shipment at a time.

6. At this moment, I have 32 units going to RIC2. I gather up these items and put them into boxes. I write
RIC2 on the outside of the boxes (You can use more than one box if needed). As I place items into a box, I mark it off on my sheet, then once everything is accounted for, I double check one more time that everything that is supposed to go to this warehouse is packed. Then I stuff the box with dunnage and close it with packing tape.

7. Next, I weigh the box and write the weight on the outside of the box. This really helps if you have more than one box going to the same FC. I put in the weight and box measurements, add another box if I have more than one, calculate the shipping, then print off my labels. If you've written the weight on the outside of the box, then you can correspond the label to the box which ensures that you don't mix up your box labels! I label the box and cover the label with clear packing tape. Done!

8. I work on the next shipment (another FC) in the same way, and continue packing and labeling until I'm done. Once all of my boxes are packed, I harass my son or husband into loading the boxes into the car. If the boys can't go with me to UPS (work and school), I've discovered that the folks at the UPS center will kindly bring out their dolly and load my boxes out of my car, and take them in for me. It never hurts to ask! I've also been known to load them into a shopping cart (there is a Kroger next to my local UPS). A girls gotta do what a girls gotta do!

This is my workflow process which is always a work in progress. What is your workflow process? Go ahead. Post your thoughts in the comments section.  

Sunday, July 13, 2014

Staying Focused with Sourcing Cycles

Focus on one task at a time and get it done.

If you're like me, you've tried numerous types of sourcing, experimented in different categories, and live in a chaotic mess. My next shipment is filled with replenishables, one offs, and bundles -all from different categories. No wonder I'm tired!

I've decided to focus my energies, and organize my sourcing into cycles. A cycle can last two days or two weeks -it's up to you, but I recommend focusing for a week or two. If you're dependent on payouts to source, then your cycle might last from one payout to the next, but the important thing is to stay focused during your sourcing cycle.

Sample of Sourcing Cycles

Cycle 1 - Replenishables
Replenishables (replens) are any product that you can purchase again and again and send it into FBA. It's something that sells consistently. And it doesn't have to be grocery, or health & beauty. I have replenishables in toys, baby, home & kitchen, and office supply. Replens are not just consumables, but the kinds of things that lots of consumers buy all the time. Think outside the replen box. A lot of my replens are also multipacks.

During your replenishables cycle, you'll want to do the following things:

  • Create "by store" lists of replens on Evernote. Keep it updated.
  • Check your replens to see how many are in stock, how many you're selling on average, and how many you should pick up.
  • Create a replens route. I have several on my list that I get from Walmart. I source at three Walmart stores. My goal is to go in, grab what I need, and get out. 
  • Check on prices and reprice as necessary. 
  • Review your profit margin. Determine if you should keep a replen or let it go.
  • Research, source, and test new replens (test 3 to 6 and track how fast it sells).

Cycle 2 - Bundles
Bundles are complimentary items that are packaged together. I'm becoming a bit of a bundle fanatic, so I need this cycle to stoke my creativity.

During your bundles cycle, you'll want to do the following things:

  • If you think of an idea for a bundle -write it down! 
  • Check to see how your bundles are selling and reprice if necessary.
  • This is a good time to set up advertising campaigns for your bundles.
  • Research the best prices for the different items you put in your bundle. Keep a list of everything that goes into a bundle, where each item is located, and the price. 
  • Write and publish exclusive information that you can include in your bundle to keep the copy cats at bay.
  • Brainstorm new bundle ideas and write them down. Test at least one new bundle idea during each bundles cycle.
  • Replenish any bundles that replenishable, and out of stock (or nearly out of stock).
  • Source the items you need for your bundle. Think about the best, most professional way to package your bundle, and purchase the necessary supplies.
  • Photography, list, prep, and pack your bundles.


Cycle 3 - One Offs
One offs are items that you generally buy just once, although you might buy more than one, but not too deep, and if the price is right. Your one off cycle is the time to hit all of your favorite hot spots and scan, scan, scan!

During your one offs cycle, you'll want to do the following things:

  • Check and reprice any one offs that have been sitting on the Amazon shelves for awhile.
  • See if you need to submit more details, or request a category change, and take care of it.
  • Review your past one offs to see which ones did well vs. which ones were duds. Keep your successes and mistakes in mind when you go out. 
  • Charge up your phone, and take an extra portable charger with you when you go out sourcing.
  • If you find a one off with potential, but without a current Amazon listing, think about your time vs. the profit potential. Creating a new listing is time consuming. Is it worth it? Can you pick up 3 or more? 


Cycle 4 - Category or Store
It's a good idea to spend time focused on a specific category or store (or maybe a specific category within a certain store). For example, you might decide to venture into the Baby category. You spend time learning as much as you can in this category by scanning, researching, and testing. Perhaps you want to become a Target expert. You live this cycle in Target (on and offline). This is a dedicated time to hone your sourcing skills, explore, and discover new treasures! Don't forget to learn about sale's cycles, store discounts, and to research which stores have the best prices in your category.

Preempt Cycle
A store is closing! It's the end of the season. There are huge clearance sales going on everywhere. It's Black Friday!

A Preempt Cycle is one that preempts another. Forget bundling this cycle. There's a store going out of business. It's okay to spend your money and time on a special occasion. Just plug this cycle in when needed.

Other Cycles
Perhaps you're thinking: When am I going to search exclusively online, focus on wholesale, or go thrifting? The sourcing cycles you choose to put into your business model are up to you. A lot sellers like to go wide, and source from a variety stores, in a number of categories. The Sourcing Cycle plan is to help you focus your time and money for better results while still taking advantage of the different opportunities available in this business. There are sellers who only source online, or focus on one category, or stick to one store, or only source wholesale. You've gotta do what works best for you.

Sourcing Cycles keep me focused. I can devote all of my time, energy, and funds in one direction without sacrificing other opportunities. It's the ultimate multitasking for an FBA business plan that goes wide.

Disclaimer: This doesn't mean that when I'm out picking up my replens, and I happen to run across a toy that I can rarely find, but I know sells like hot cakes for a ridiculous ROI that I won't snatch it while I can. I've done this when I've gone out grocery shopping for my family! If you create rules for yourself, then make your self-inflicted rules flexible for those magical sourcing discovery moments.

Saturday, July 12, 2014

Going On A Q4 Toy Hunt

Decide upon a strategy and carry it through, evaluate and reflect on it, then revise it. 

I'm going on a toy hunt!

I haven't been through Q4, but everything I've read and heard indicates that it's going to be FANTABULOUS! I've been trying to learn as much as I can in order to develop a Q4 plan (the fourth quarter of the year -October, November, December). 

Toys are hot, hot, hot during the Christmas season, but I'm not going after the hot toys. Instead, I'm going after the popular characters. I can't compete with Amazon (or Walmart for that matter) the number 1 or even number 100 toy, so why bother? My goal is to make a profit, not play race to the bottom just to unload stuff.  

I have two main strategies that I plan to put into place:

1. Buy now. Buy clearance (60% off or better). Buy throughout the season until the "Too Late" timer goes off.

I picked up a toy yesterday at Walmart for $10. It's a major character, but the toy itself has it's own "characters". I remember seeing these last Christmas for $20-30. The price never dropped. In fact, I was surprised to find this one off for only $10. The other ones on the shelf were still full price! I scanned it, and found that there are only 2 FBA sellers, and the price ranges between $50-60. I don't think this is an easy to find toy, so I'm betting that the price will stick, and the rank is decent enough now to convince me that it will fly in Q4. 

When I go into a store (including grocery stores), I check the toy clearance sections. I don't mind if it sits in the warehouse for a couple of months. I'm stocking up on toys that I think will fly off the shelves as Christmas approaches. I stay focused on buying popular character and brand name toys. In truth, I'm not doing anything different that I've been doing in toys, I'm just trying to do more of it. July is "Tis' the Season to Discount Toys", so I'm getting as much as I can afford right now.

2. Bundle up.

I've been on a bundle kick for a few months now, but I really enjoy making bundles in toys. It's easy for me to think of themes, and put things together that I think would make that great extra little Christmas gift, stocking stuffer, or gift from aunty who lives across the country. I've been testing toy bundles for a few months, and my strategy is already working. I've sold out of one bundle packed with cool items for a popular character. Right now, I actually have more ideas than money!

I believe this is the time to make bundles for Christmas. Once Q4 hits, I hear that it's going to get CRAZY! I'm looking forward to every minute of it. I will come back at the end of the year, and let you know how my two strategies played out.

What are your toy buying strategies for Q4? Leave your answers in the comments. 

Friday, July 11, 2014

What Can I Sell on Amazon?

Successful people get that research is necessary, but action is mandatory.

The almighty question: What can I sell on Amazon?

The answer: stuff

Okay -that answer sucks. No one wants to hear "stuff" or "widgets" or "thingamigingys". But no one is going to tell you exactly what they sell either. Competition is stiff enough without inviting it.

So what can you sell on Amazon?

You can sell anything in a category that doesn't require approval. Start with toys, home & kitchen, office supplies, baby items (no clothes or accessories), sports & outdoor, and lawn & garden. You can sell just about anything in these categories (with some exceptions). It's your job to read through seller central and learn what can and can't sell. Do that first.

Once you have a handle on the categories -choose one. Pick one that you know something about. Your a gourmet chef (or at least that's what you try to be in the kitchen), then focus on kitchen stuff. You have a passel of kids -toys. You live and die for sports -yeah, sports. Pick a category in your comfort zone. Live and breathe it for awhile.

Then pick a store. Go to that store and scan everything in that category until you're done (which could take hours or days or weeks). Just pick a small section, and scan every single item in that section. When you find profit potential -go deeper with your research.

Researching a Potentially Profitable Item:

  • What is the buy box price?
  • How many sellers have the item (how many FBA and how many MF)?
  • What is the average low price among the 10 lowest priced sellers?
  • What is the ranking?
  • Is Amazon selling this item themselves?
  • How much profit could you make after cost, fees, and shipping & handling?
  • How much does the item weigh? How big is it? (Weight & size effects shipping costs inbound and fee wise.)
Once you've discovered a potential item look to see if you can buy more than one. Most sellers suggest testing 3 to 5 to see if it's a seller. If you can get 10, and the cost is super low (like a dollar or so), then you might go ahead and splurge. This is something you have to decide. 

Keep working the category in this one store, then move to another store, and then another. Get a strong sense of what sells in this category, what makes a good profit, and where to find the best deals. Do an online comparison as well. 

You will probably find stuff that no one else has found, or only one or two sellers have found. Stick with the buy box price. Don't go low to go fast and end up taking everyone to the bottom with you. If it's already selling at $20, then it will sell at $20. If there are other sellers -SHARE the buy box. It's okay! You will get your turn. If you price your item at $10 just because you can, you might sell it a little faster, but you're also leaving a lot of money on the table! And other sellers will not thank you for it. So please...don't go there (tirade over).

There you go. You can sell stuff on Amazon. Lots of stuff.

Thursday, July 10, 2014

The Perfect White Background Using Adobe PhotoShop

Perfection is a matter of practice and perseverance, and not expecting true perfection. Be as perfect as you can be.

A number of years ago, I went for broke and bought Adobe Creative Suite which includes PhotoShop. I confess that the only thing I bothered to learn was how to change the size of an image. The program is so complicated that it boggled my mind. And that is what I kept telling my son who is a self-taught PS master. Couldn't he fix the white background for me?

He did fix several photos while complaining that it wasn't that hard, and that I could learn to do if I would just listen. Meh...

I finally gave in, and he's right -it's not that hard.

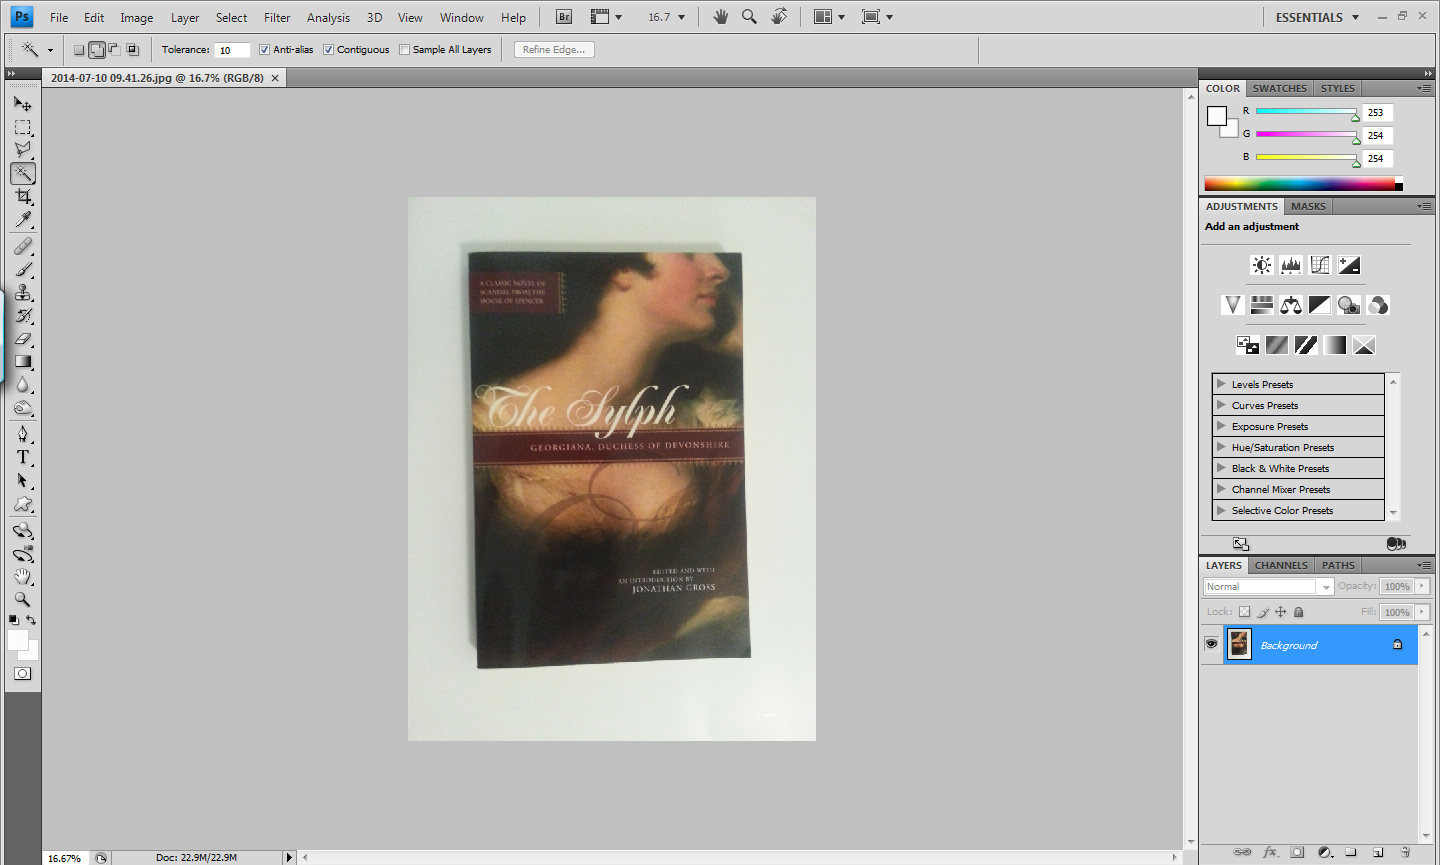
First of all, you need to take the best picture you can. Light is key in photography. I'm far from being a great photographer. In fact, I use my cell phone to take my pictures for newly created listings on Amazon. I have learned a couple of tricks. I take pictures in my kitchen (during daylight hours) because it has the brightest light when I turn on all of the lights. I use a white poster board for the background unless the item is white, then I use a blue or green poster board. Once I'm satisfied with the picture, I open it up in PS on my computer. (I just randomly grabbed a book in my house for this example. I didn't take a lot of time trying to get a great photo. This is for white background demonstration purposes only.)

There are two tools that I use to create a white background. I don't know what they are actually called. I call them the Magic Wand and the Coat Hanger.
I start by clicking on the Magic Wand, then I click into the space that needs to be white. Sometimes it will magically make fabulous straight lines all the way around the object, and sometimes I have to keep clicking throughout the space until the lines are clean.

Keep clicking on the fuzzy black lines until it's nice and clean all the way around.


Next, hit the DELETE key. Your white background is there, but you're not done just yet. You have to click on SELECT, then click on DESELECT.
If you're edges are clean and white, save your picture. You are done!

But wait...
Do you see the grayish yucky edge? Sometimes it doesn't come out clean and white around the edges. Click on the Coat Hanger tool, then click exactly on the edge of where you want to create a line. Drag the tool until you reach the end of the space, then drag it up, over, and around until you've created a blocked off area. Double click where the blocked off area connects. Hit the DELETE key. Click on SELECT, then click on DESELECT. Work in the same manner until you've cleaned up all of the gray, yucky area and your background is nice and white.


I confess that it took me a bit of practice, but once you get the hang of it, you'll find that you can fix your white background using PhotoShop in no time.